Bran Dougherty-Johnson noted similar efforts -- Colin Sebestyen's Futura livefont and a 2008 Digital Kitchen thing for the Webbies:
August 31, 2010
Moshun and similar 'animated fonts'
Bran Dougherty-Johnson noted similar efforts -- Colin Sebestyen's Futura livefont and a 2008 Digital Kitchen thing for the Webbies:
3D animated wings with Trapcode 3D Stroke
Robert Rodriguez 'film school' videos
August 29, 2010
After Effects FAQ List
 The Adobe Forum has an After Effects FAQ List, which has about 20 FAQs by Todd Kopriva and Adolfo Rozenfeld. These cover many basic common problems from CS4, as well as adding some recent general guidance.
August 27, 2010
TV Distortion Bundle: déjà vu all over again
There's much more in the product pages that you might check out, even if you already have the Boris, Digieffects, or Sapphire bundles. Of course you can do this stuff already in After Effects, but with far less ease, for example leveraging the built-in Bad TV Animation Presets. Other approaches for similar results were discussed in previous posts like Bad TV: new Pixel Bender + others and Chromatic aberrations, seperating RGB.
August 26, 2010
Depth, a newish filter from Digieffects
Digieffects seems to be breaking off another plug-in from its legacy products with the launch of Depth, a filter found in the old Buena Depth Cue package. There's no official pricing yet, just Vimeo video partly via Lester Banks:
Digieffects Depth Spot from digieffects on Vimeo.
Digieffects Depth Intro Tutorial from digieffects on Vimeo.
Fxguide review of Colorista II
 Fxguide posted an informative review of Colorista II by John Montgomery. Six recent tutorials and more can be found in recent AEP posts.
Update: Prep Shoot Post shows how a little Colorista II makes for GOOD LOOKING CINEMA - THE NEW DIY AESTHETIC.
August 25, 2010
Create3DShapes adds Platonic solids & compatibilty
 AE Scripts has a great collection of scripts to make working in AE 3D easier. There's a new version of Create3DShapes that allows you to distribute layers as a box, sphere, cylinder, pyramid, or ellipsoid (e.g. rugby ball, with controllable x,y,z-radius) -- as well as a 3D Platonic solids (see video), a MengerSponge (pictured), and 3DFallingDominoes. This version has a gain in speed using precomputed arrangements and can create a giant sphere with up to 1000 layers in seconds.
August 24, 2010
Targeted Curve Adjustments from a new series on Photoshop
Colortrails QuickHit #2: Targeted Curves Adjustment from Colortrails on Vimeo.
A wireframe sphere in After Effects
Should Adobe Improve Expressions?
Andrew Kramer has opened up a discussion with thoughts on Should Adobe Improve Expressions?
Intro to scripting in AE, pt 1 expressions
 AEtuts has started a series of After Effects tutorial videos by Frederik Steinmetz. The first one is Introduction To Writing Scripts For AE – Expressions Day 1.
See also AE CS5 Help on Scripts and Expressions, as well as the piled-on post Expressions & Scripting Resources for After Effects and posts tagged expressions and scripting. By the way, Dan Ebberts contributes a Scripting Overview chapter to Creating Motion Graphics With After Effects by Trish & Chris Meyer, and Lloyd Alvarez has had an ongoing course teaching an Introduction to After Effects Scripting at fxphd.
August 23, 2010
Create water with displacement and particles
After Effects Quick Tip - Creating Realistic Water with Displacement Maps and Particles from Premiumbeat on Vimeo.
Voodoo Camera Tracker: free matchmove alternative with AE
"Matchmoving has been discussed a lot these days and it has become accessible for more and more people. With the introduction of programs like Syntheyes, PFTrack, and The Foundry’s CameraTracker plug-in the reconstructing of a 3D camera move has been made easier. A lot of people however are not aware of other solutions that are available, like free software. Voodoo Camera Tracker is one of those pieces of software and today I´ll be showing you how to solve your shot and then create some awesome 3D stuff..."
Mad Men: saturation, psych, and beyond
@StudioDaily noted an insightful BBC blog post by filmmaker Adam Curtis, director of documentaries on desire and fear Century of the Self and The Power of Nightmares: The Rise of the Politics of Fear, on the real-life advertisers who inspired the TV series Mad Men. See also Meme tracking and the News Cycle; here's an excerpt from Madison Avenue: Experiments in the laboratory of consumerism:
"The widespread fascination with the Mad Men series is far more than just simple nostalgia. It is about how we feel about ourselves and our society today.
In Mad Men we watch a group of people who live in a prosperous society that offers happiness and order like never before in history and yet are full of anxiety and unease. They feel there is something more, something beyond. And they feel stuck.
I think we are fascinated because we have a lurking feeling that we are living in a very similar time. A time that, despite all the great forces of history whirling around in the world outside, somehow feels stuck. And above all has no real vision of the future.
And as we watch the group of characters from 50 years ago, we get reassurance because we know that they are on the edge of a vast change that will transform their world and lead them out of their stifling technocratic order and back into the giant onrush of history.
The question is whether we might be at a similar point, waiting for something to happen. But we have no idea what it is going to be."
Update: some may enjoy The Mad Men Era at The Museum of Advertising.
August 22, 2010
Apple's Design Inspiration + iTV
Anamorphic Lens Flare with the Glow filter
His tutorial is based on his older one, but now custom lens flares are far more accessible with the release of the inexpensive yet deep VC plug-in. For background see Video Copilot Optical Flares in review.
August 19, 2010
Lights, shadows, 3D in After Effects
 Steve Holmes of Energi Design has a new After Effects tutorial video at Artbeats, Lights, shadows, action!:
After Effects error: "strange situation"
More generally and in the past at least, Troubleshooting After Effects (all versions) at General Specialist was handy. See also the previous entry What do to when AE crashes, which was really relaying a request for using the Crash Reporter, which you wouldn't see with error dialogs but only if AE crashes.
August 18, 2010
Knoll Unmult: free AE filter
A similar filter shipped with AE CS5, but doesn't get installed by default; see Unmult for CS5: Pixel Bender 'Alpha from Max Color' for background on that Pixel Bender and how to do-it-yourself with channel filters. Here's a 3-minute excerpt from a recent tutorial that explains what Knoll Unmult does and how it works:
How to use the FREE plug-in Knoll Unmult, from Red Giant Software on Vimeo.
Stabilization and object removal with AE CS5 +tracking
Update: Premiumbeat has something similar, taking "a look at the process of stabilizing footage using Adobe After Effects built in Stabilization feature. We will also look at how to apply a graphical element to the stabilized footage and then how to reverse the stabilization, to give a motion tracked effect to the graphics."
Underwater explosion scene with AE & 3D
- Composite multiple explosions to create a underwater charge
- Build volumetric lighting AND shadows in AE
- Basic concept of a 3D animation pipeline for After Effects
- Combine multiple render passes in AE
- Add glows and camera shake
- Tips for adding realistic bubbles with the Foam plug-in
Nulls vs. lights as emitters in Trapcode Particular
"Some people like to use Nulls or Solids as emitters in Particular, and some like to use Lights. But when is it best to use one or the other? Both have strength and weaknesses. Here you'll learn where an when to use them. Hey - it's not glamorous stuff, but this is some good Trapcode Particular info that will help you out when you need better control of your emitters."
Red Giant QuickTip #18 : Nulls vs Lights as Emitters in Particular from Red Giant Software on Vimeo.
August 17, 2010
XML Gibson: script expands XML export
August 15, 2010
The making of 'Something Left, Something Taken'
RGTV Episode 47: Tiny Inventions from Red Giant Software on Vimeo.
August 11, 2010
Camera shake from hand held track
Other tutorials and options on the subject were discussed recently in Realistic Camera Movement using hand held track. Here's the Premiumbeat tutorial:
Creating a Realistic Camera Shake with After Effects from Premiumbeat on Vimeo.
Old film looks with Particular and Color Finesse
- GC Swot posted 39. Aged Film Using Particles on "how to create film scratches, dirt and dust using Trapcode Particular, which can be saved as an importable element for future projects. Learn how to color correct the footage for an aged, vintage film look..."
- Now, with light leaks, is Red Giant Quicktip #17: Old Film Look, "Aharon Rabinowitz shows you how to create an old film look with light leaks. He'll be using Trapcode Particular to create the light leaks, and the tools in Magic Bullet Looks to create the look of old damaged footage."
Red Giant Quicktip #17: Old Film Look from Red Giant Software on Vimeo.
Update: For an approach using Color Finesse and 8mm stock, see 01-After Effects | Vintage 8-mm Film Effect Tutorial from James Zanoni on Vimeo.
Using the toComp expression
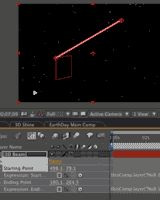 via @EdenExposito, Harry Frank has a new tutorial (in QT), Using the toComp Expression, which demonstrates easy-to-use methods on how to use the “toComp” expression with lens flares, light rays, and the Beam filter.
Harry previously mentioned the expression in Harry Frank's 5 Favorite Expressions and in a video tip for making a 3D volumetric light with Trapcode Shine (and probably in his training products).
This layer space transform expression was also popularized by Dan Ebberts in his 3D lens flare case study, by Andrew Kramer in a few tutorials (see Lens Flare on 3D Lights?), and by Chris & Trish Meyer in their series on expressions.
Update: there's also a Vimeo version,
Using the toComp Expression from graymachine on Vimeo.
August 10, 2010
Carbon fibre+ brushed metal in After Effects
Shortformvideo also posted a video of a classic technique that combines blur, noise and time control settings to create a brushed metal effect.
Update: also check out Deke’s Techniques #4: Creating a hammered metal background,
Infographic and Data Interface Videos
// nothing_is_true from aconite on Vimeo.
Slider Control for pop-up list in AE
Red Giant Quick Tip#16: Creating a Preset Slider for Knoll Light Factory EZ from Red Giant Software on Vimeo.
Kronos & Camera Tracker filters +training +pricing
 Last March at NAB, The Foundry made a splash with news of new plug-ins for After Effects, Kronos and 3D CameraTracker, which are being released today.
Kronos is for "hard core retiming" -- leveraging GPU and built on a newer foundation than the previously-licensed Timewarp filter bundled in After Effects.
Camera Tracker is a new After Effects plug-in for matchmoving by The Foundry. It analyzes "source sequences to extract the original camera's lens and motion parameters, allowing you to composite 2D or 3D elements correctly with reference to the camera used to film the shot. You can now match camera moves within Adobe® After Effects®' 2.5D environment, opening up new, robust options for the placement of composite elements, such as the creation of Fringe / Heroes style 'in scene' titles, the virtual extension of sets", etc...
Marc R Leonard has already started a tutorial series on AEtuts: Overview Of The Foundry’s New “CameraTracker” Plug-in.Update: The Foundry has added 10 tutorials and docs for Camera Tracker (example below), and 3 tutorials and footage for Kronos in the manual.
Update 2: The Foundry has added details on buying, renting, and evaluation at the store pages for the filters.
Highlight recovery in Colorista II with Stu Maschwitz
06 - Highlight Recovery With Magic Bullet Colorista from Red Giant Software on Vimeo.
Use JPEG files in Camera RAW
In a 2009 Creative Cow video, AE Quicktips #8: Camera Raw Sequences, Carl Larsen showed a similar way to import a .jpeg or .tiff sequence into After Effects with Camera Raw development settings applied. There's more on using RAW files in After Effects Help; things will work smoother if app versions are in sync.
Update: on the AE-List November 2011, Chris Prosser (software engineering manager for After Effects) said "Alas, RAW is just slow. The engine highly optimizes quality over speed due to its heritage. I often will convert them to a better intermediate format (some kind of 16 bit format)."
August 8, 2010
Intro to After Effects plug-in development
 Satya Meka distills his own recent experience in the area in his brief Intro to After Effects plugin development for beginners, which includes info on the AE SDK. He also posted Intro to Pixel Bender for Non-Programmers not long ago. For a general overview of filters in AE, see the Plug-ins page in AE Help.
Mac users have access to a variety of other tools that leverage Apple's Core Image OS framework: Apple Quartz Composer, FxFactory, and Pixlock Effect Builder AE. The latter two make plug-ins supported in After Effects. Apparently QC Integration FX no longer offers compatibility with After Effects.
Outside of the AE SDK, Windows users have only disjointed features available in Adobe's Pixel Bender (the new hope after an aborted Python Plug-in demo from Adobe and the sale of Useful Things to SONY). There was more hope for the now-in-limbo Conduit for Flash Pixel Bender and other sundry image processing geekery end user tools, but support for the AE plug-in format has not been extended. Even so, the profusion of free Pixel Benders, scripts, and expressions should keep most users busy.
—>> Script panel UI really changed the game. For more on AE scripts, see Using and creating After Effects scripts: Some learning and script resources.
Creating After Effects plug-ins using the SDK is "surprisingly easy" -- if you believe the aging MacTech article (from Volume15, Number 9): “How to Write Plug-Ins for Adobe After Effects” by Kas Thomas (web archive). What they mean is that it's easy if you're a C or C++ programmer, or have ingrained faculties like Satya. But the SDK itself does include its own introduction, which is intelligible to everyone who wants to know what AEGP or PiPL means.
—>> To ask questions about writing native effect plug-ins for After Effects, try the After Effects SDK user-to-user forum.
There's little commentary from actual developers apart from Satya's article. Here's a few older AE-list comments on porting PS filters. Brendan Bolles:
"I think the After Effects SDK is way easier. For example, your standard UI can be built with just a few lines of code and will be totally cross-platform. And don't worry about putting a preview in your interface - it already happens in the comp window. AE works a bit differently from Photoshop so there's a learning curve, but porting should be pretty easy once you figure it out."Darrin Cardani added:
"The thing I found most confusing is the calling sequence. When Photoshop calls your filter plugin, it follows a pretty standard sequence telling you what to do next. AE is a little more fluid in that sometimes you might not get called to do certain things, while other times you will. But once you look through the example code and write one, it starts to make sense. Be sure to join Adobe's mailing list so you can ask questions about the process when you get stuck."
Update: in June 2001, Audrey Doyle published Mix & Match in Computerworld, a brief history of AE plug-ins.
August 6, 2010
Working with After Effects & Illustrator CS5
 Motionworks has another Adobe E-seminar, After Effects: Working with Illustrator CS5. This one's a 50-minute look at the recent changes in the range of techniques in using Illustrator CS5 with After Effects CS5.
Update: Eran Stern posted the quick intro CS5 Vector Workflow earlier,
August 5, 2010
Skin Retouching in Colorista II with Stu Maschwitz
which "shows you how you can quickly and easily use Magic Bullet Colorista II for cosmetic skin retouching. You'll learn simple and effective techniques for subtly downplaying signs of age (such as wrinkles or skin blemishes), and giving pale skin a healthy color, without effecting other elements in your shot."
05 - Cosmetics: Skin Retouching with Magic Bullet Colorista II from Red Giant Software on Vimeo.
For more, see an earlier post "Correct" skin tones and others tagged skin.
Update: See also Quick Skin Tone tutorial in FCP:
Monsters GT for AE Mac
 GenArts just announced Monsters GT for the Mac, with over 50 effects including a variety of stylize, distort effects, fluid, trail, and particle effects. A Windows version is also available for CS5 & CS4.
PVC has a nice review of this filter set by Kevin P McAuliffe. [update: see also his Review - Genarts Sapphire v5 for Adobe’s After Effects]
Monsters GT has floating point support, and the fluid simulation filters especially will benefit from GPU optimization, supported at the maximum in NVidia GeForce 200 or 400 series or Quadro 5800. Many of these are unique filters from the Flame and Smoke world, though some are similar to other AE filters. Monsters GT was acquired in the purchase of SpeedSix, adding to GenArts stable of AE filter sets that include Sapphire, Tinder, and particleIllusion. Monsters GT features these tools:
- Stylize effects such as CCTV, NightVision and Brush
- Warps and distort effects such as HeatHaze, Puddle and Ripple
- Particle effects such as Rain, Smoke and Snow
- Fluidz, a set of plug-ins that use the power of 2d fluid dynamics to create Fire and fluid flow simulations (was in Raptors)
- Trailz, a set of plug-ins that create a variety of smooth, particulate and stop-motion trails (was in Raptors).
August 4, 2010
Motion blur added to VC Optical Flares
"The feature is simple to use, just turn on motion blur for the layer and comp switch, then adjust the samples in the plug-in Motion Blur roll-out. The light streaks in the sample video are made with Particular and the light is moving with a wiggle expression. Remember, too many motion blur samples can be slower so adjust the value as needed for your project."
For more on Optical Flares, see Video Copilot Optical Flares in review or click the tag Lens Flare.
Bizarre robot stock traders

While The Atlantic does have some editorial problems, see for example Atlantic shocker: Senior editor Clive Crook fabricates another quote to smear Michael Mann, here's an excerpt from Market Data Firm Spots the Tracks of Bizarre Robot Traders by Alexis Madrigal:
"Mysterious and possibly nefarious trading algorithms are operating every minute of every day in the nation's stock exchanges.
What they do doesn't show up in Google Finance, let alone in the pages of the Wall Street Journal. No one really knows how they operate or why. But over the past few weeks, Nanex, a data services firm has dragged some of the odder algorithm specimens into the light.
The trading bots visualized in the stock charts in this story aren't doing anything that could be construed to help the market. Unknown entities for unknown reasons are sending thousands of orders a second through the electronic stock exchanges with no intent to actually trade. Often, the buy or sell prices that they are offering are so far from the market price that there's no way they'd ever be part of a trade. The bots sketch out odd patterns with their orders, leaving patterns in the data that are largely invisible to market participants.
In fact, it's hard to figure out exactly what they're up to or gauge their impact. Are they doing something illicit? If so, what? Or do the patterns emerge spontaneously, a kind of mechanical accident? If so, why? No matter what the answers to these questions turn out to be, we're witnessing a market phenomenon that is not easily explained. And it's really bizarre."
August 3, 2010
Create a Light Wall: tutorial & preset
Similar treatments can be found in Quba's previous tutorials and in Creating an LED sign in After Effects, Creating Automated Flashing Light Patterns by Chris Zwar, 3D Ball Dispersion with CC Ball Action, and Jumbotron in After Effects.
Light Wall Tutorial Preview from Quba Michalski on Vimeo.
UPDATE: Kevin P McAuliffe created a video wall in 3D space in Complex, Real-World Effects with BCC Wild Cards.
'Matrix' AE script makes cards dance
 AE Scripts has a new After Effects script, Matrix, which breaks your layer into pieces and animates it for you with a bunch of options.
It's an inexpensive script, but it's not clear what advantages it has over built-in effects like the Card Dance filter [see comments for some good reasons]. For more on Card Dance and similar effects, see Animate a Photo Mosaic in After Effects, Card Dance transition, Camera Rig script & Particular 3D Ribbon, and Serial 3D flip effect in AE.
See also a Total Training video from Brian Maffitt (he created the effect) on Using gradients to control the Card Dance plugin's behavior, and Ayato's Card Dance Flag.
Align and Orient in AE CS5
'Select Equal Keyframes' in After Effects
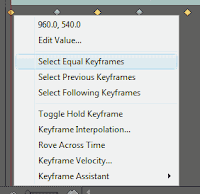 There are many ways to do things in AE and some usage patterns can lead to us ignore existing features. For example, if you want to select all keyframes with the same value for one property, just right-click on one of the keyframes and choose "Select Equal Keyframes."
There's much more on keyframes in Creating Motion Graphics with After Effects by Chris & Trish Meyer.
Power Masks in Colorista II with Stu Maschwitz
04 - Working with Power Masks in Colorista II from Red Giant Software on Vimeo.
August 1, 2010
Looping with expressions in After Effects
 Chris and Trish Meyer posted the 8th of the 12-part series Deeper Modes of Expression, based on an extra in their book Creating Motion Graphics with After Effects, which was recently updated for CS5. The 8th installment is Deeper Modes of Expression, Part 8: Going for a Loop on "causing animations or footage to loop by repeating already-placed keyframes or segments of time. The previous installment was about decision-making loops (if/then and while/do statements). This installment is about a different kind of loop: repeating an animation without having to loop footage or places copies of an animation end-to-end"


