Adobe guys Michael Coleman and Todd Kopriva are trackingAfter Effects and Snow Leopard, the 10.6 version of Mac OS X. Besides upgrading to AE 9.02 for multiprocessing, there's not much up. For Photoshop & other products, John Nack is a good source of information.
As a precaution, deactivating AE (or any CS4 app if you have a bundle) might be a good idea since you could avoid dealing with customer service if there's a problem with the OS install.
[update: it turns out thatSnow Leopard requires 9.0.2, and you do lose an activation credit so deactivating is advised]
Only time will tell if the QuickTime gamma issue is really solved with current versions of the QT players and other software and old files, etc. While it doesn't get too specific, there's even a Compatibility Wiki by Wikidot for many Mac apps.
While acknowledging a middle ground for discovery and beauty, Lima draws a distinction between information visualization and information art, which is more often vernacular eye-candy. Here are Lima's 10 directions for any project in this realm:
Update 3: Cool Infographics notes a mash-up of Lima's main site, "Bestariohas createdreMap, an interactive portal to view all of the infographics posted onVisualComplexity.com, and it's amazing. They've created semantic connection between the different infographics using tags tat allow for an incredible browsing experience."
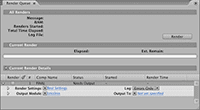
You can turn off or customize the sounds made by renders in the Render Que in After Effects. You can replace the render-complete sounds on Windows by adding files named "rnd_okay.wav" and "rnd_fail.wav" to this folder in Windows XP and Vista:
C:\Documents and Settings\[user_name]\Application Data\Adobe\After Effects\9.0.
C:\Users\[user_name]\AppData\Roaming\Adobe\After Effects\9.0
You can also turn off render chimes by setting "Play sound when render finishes" to "0" in "Adobe After Effects 9.0 Prefs" file (in the same location as above for Windows, or for Mac in Users/[user_name]/Library/Preferences/Adobe/After Effects/).
On Windows Vista (one copy anyway), getting the "Happy-Happy-Joy-Joy" sound (Lynda Weinman's phrase for the original successful render sound) to return after render doesn't seem to work by changing the "Adobe After Effects 9.0 Prefs" file to "Play classic render chime" to "1".
This info is in AE Help, but it doesn't have info on how to replace sounds on the Mac. Information on the web seems based on old methods for Mac OS 7 to 9, which involved mucking around in Mac a resource fork editor like ResKnife.
Apple Motion 4 has several refinements including shadows and reflections, demoed on Apple's website. Lynda.com's free Final Cut Studio overview also looked at creating shadows, reflections, and specular highlights.
Recently on MacBreak Video, Mark Spencer looked a bit closer at shadows and reflections in Motion 4. Will Adobe respond to Apple, especially in the reflection gap, or will it be left to user kluges like extrusions? In the meantime, see Built-in reflections in AE for Chris and Trish Meyer's formula and tips for creating "faux" reflections in After Effects without 3rd party tools like RGS Warp or Zaxwerks Reflector.
Update: a Motion extra from Oliver Peters, "I'd recommend that you DO install the Motion content. The biggest content chunk will be the audio files for STP and those can be easily installed on an external drive or not at all. If you don't install the Motion content, some of the text behaviors will not show up in the pulldown menu."
motion graphics eXchange noted a 3-part video tutorial (QT downloads) posted by JMDesign, After Effects Lexus Tutorial by Barbecue. In the tutorial, Ruediger of Barbecue Design shows you how they created parts of a commercial for Lexus Toyota Hybrid Drive using After Effects and Trapcode Particular. There's also discussion of an AE script by Paul Tuersley to make a panorama (or alternatively Trapcode Horizon), and how to integrate the particles into the environment of a 3D scene in After Effects. Here's the original video:
Note: JMDesign also posted some found AE projects from an idea too good to die in Trapcode People Resurrected.
Dav Rauch from The Orphanage walks through their Nuke work on the HUD sequence from Iron Man in movies below from The Foundry's Youtube Channels (via 5tu).
Other reports and interviews on the same subject from Fxguide and Adobe --as well as a tutorial project by Video Copilot -- can be found in these previous posts.
Update: Iron Man 2UI & motion graphics, both stills and short movies can be found at Perception: "Using a combination of the Adobe Creative Suite of products and Maxon's Cinema 4D for 3Danimation, Perception put out full 2k renders for what would ultimately be a film output for IMAX presentations and normal theatrical release. All working on the Macintosh platform,Perception's team of designers, compositors, animators and rotoscope artists workedtirelessly to deliver the entire package."
Update: In fxguidetv #099 Jan 07, 2011, Marshall Krasser details ILM's work on Iron Man 2 using Nuke.
Color Link by Eran Stern is the latest tutorial in the Creative Cow After Effects podcast. Eran shows you how to create a colorful disco-styled tunnel using a Shape layer, CC Cylinder, and matching the look to video using the Color Link effect.
Now, using a normal map with Normality, Video Copilot covers a lot of ground showing you how to use After Effects lights for possible relighting and reflection/refraction effects in a new tutorial (with project) Scene Re-Lighting.
A simple demonstration of how you can create your own maps is Normal Map Photography by Ryan Clark.
Topher Welsh's generic roundups fill some gaps; here's his latest collection of AE and 3D tutorials added late Thursday: 72 Tutorials For Ya!
Of the ones not mentioned here previously, AETuts' Create Harry Potter Titles by Robert Holtby is not complicated, but you do get a Harry Potter font and see how to use a Bevel and Emboss Layer Style to make text seem like 3D, etc.
Greyscale Gorilla tries to "make sense of how layer order effects visibility in After Effects when using 2D and 3D layers. There is also a tip on how to force a 3D element into place by using 2D layers."
Video Copilot posted a particle explosion tutorial that uses only tools built into After Effects. It builds "several particle systems linked to a single control layer for precision animation with the standard Particle World system." A Pixel Polly filter shatter is also used.
Stereo3D Toolbox from Tim Dashwood is a new FxPlug filter designed to work with After Effects, Final Cut Pro, Motion, and Final Cut Express. It requires Mac OS X 10.5 (Leopard) and a supported graphics card.
Built upon technology from FxFactory, Stereo3D Toolbox lets you output "media to a wide range of Stereoscopic 3D formats (side by side, over/under, checkerboard, interlace, anaglyph) as well as manage the demuxing of side by side, interlace and over/under formatting. Comprehensive compositing features and capabilities include keyframeable x, y, z axis convergence, individual left/right eye scale, color correction, selective flip/flop, reframing and 'auto scale' compensation."
They have several tutorials up already; this one that demonstrates how Cineform Neo3D works and how to add Stereo3D Toolbox to Neo3D muxed clips:
Update: Fxguide.TV (#64) talks with Enrique Criado on the different aspects, both technical and narrative, of stereoscopic production.
You can watch the tutorials on iTunes or at RGTV, but here's a brief on the script:
Mocha Import explained in 3 Minutes from Mathias Möhl on Vimeo. Update: Mathias briefly clarified the strengths of approaches to tracking in AE in comments on his blog:
I personally use Mocha + MochaImport now for almost all tracking tasks, since tracking is more easy, robust and acurate with Mocha than with the buildin AE tracker. However, if you want to avoid the overhead in the workflow (switching to a separate application for tracking, importing the footage there and so on) and track in directly in AE, both TrackerViz and Tracker2Mask are your best friends.
use *MochaImport*
for all kinds of tracking tasks you want to do with Mocha, including corner pinning, stabilization tasks, rotoscoping tasks (as I will show in the second part of the creative Cow tut) and for compositing of moving stuff (with the stabilize precomp and RG undistort precomp functions). For rotoscoping, the mocha Shape plugin is a good alternative.
use *Tracker2Mask*
for just one specific task: tracker-assisted rotoscoping. Before you start keyframing masks for hours, track a few points and let Tracker2Mask assist you in the keyframing process. Use it in combination with KeyTweak.
use Nab's *TrackerViz*
if you need the buildin AE tracker for anything else than rotoscoping. In particular handy is the function to average tracks which makes out of a bunch of good but not perfect tracks one rock-solid track.
use *KeyTweak*
to correct drifting tracks (if the drifting was not eliminated by averaging with TrackerViz) and to continue tracks of points that leave the screen (see my Postcard Tutorial for details).
Update 2: in his post, Mocha and Perspective Distortion, Mathias clarified some confusion:
"Both my Mocha Import explained in 3 Minutes video and my tutorial on Red Giant TV have caused some confusion concerning the question whether Mocha can track perspective distortion and in what cases Red Giant Warp is needed in addition. So here are the facts:
(1) Mocha AE can track perspective distortion, even without Red Giant Warp. This happens if you enable the shear and perspective options.
(2) If you tracked perspective distortion with Mocha, it only ends up in After Effects if you use the corner pin data from MochaAE and not the transform data.
Now, if you want to use the MochaImport script to create a stabilized precomp, you have two options: Either you do it with transform data, or you do it with Red Giant Warp and corner pin data. Hence, point (2) implies that
(3) If you want to create a stabilized precomp with MochaImport, you only get the perspective distortion with Red Giant Warp .
(4) If you just want to do a corner pin or want to use the Mocha Shape plugin, you get perspective distortion and don't need Red Giant Warp.
Take home message:
If you track with shear/perspective enabled, don't use the transform data to get the track into After Effects.
One question is left, I guess:
What if you have to use transform data for your task and have a clip with perspective distortion (e.g. if you want a stabilized precomp but don't have RG warp)?
Then do the track whithout shear and perspective enabled. The resulting track will not be as good as with shear and perspective enabled, but at least no shear/perspective information is thrown away during the export to transform data. Hence you will get in total a better result (but don't expect miracles - with shear/perspective enabled and corner pin data or the shape plugin the results will be much better)."
Create your own After Effects filter? Well actually it would be a Pixel Bender plug-in for CS4, and you can just download it from Maltaannon's Introduction to Pixel Bender tutorial page.
Apparently, you can also do Bicubic resampling with Pixel Bender, which is something that AE lacks (except with 3rd party filters). This demo version needs work to be useful in AE though.
Chad Perkins has a similar treatment on Lynda.com. This effect goes back to the earliest days of After Effects when Photoshop didn't have layers & dinosaurs ruled with the Calculations command, when transfer modes were anyone's game, and VideoFusion seemed easier.
Chris Zwar has 3-part video tutorial looking at advanced 3D animation in After Effects on PVC, dubbed The Centrica Carnivale. This isn't a detailed step-by-step tutorial, but a series that "looks at all aspects of the project -- from the initial client brief through to final delivery and gives insight into the 'real life' stages of an After Effects project."
Wired Magazine gathered 10 of this year’s best scientific visualizations as judged by The Department of Energy in June. See Best Science Visualization Videos of 2009.
"Collaboration is the new watchword in the advertising, production and online video businesses, Daisy Whitney reports in this week's New Media Minute. She explains how agencies, production houses and creators are turning to tools from Adobe, Wiredrive, and Facebook to craft new projects, including 'Mass Animation' in which animators from around the world contributed shots for the upcoming short film Live Music.
Daisy is also starting a contest for video creators to have their work featured in her show."
If you're interested in the idea of a shooting video with a DSLR camera but follow the developments sporadically, Oliver Peters has a meaty illustrated overview of one camera in Canon EOS 5D Mark II in the real world.
His other recent posts have provided good coverage of FCP plug-ins and more.
Motionworks interview Unplugged 5 features Brian Maffitt, co-founder of Total Training and Atomic Power Corporation. Maffitt's Atomic Power filters Shatter, Foam, Vegas, Colorama, Radio Waves, Wave World, Card Dance, Caustics, Psunami, etc. were mostly absorbed into After Effects.
The Adobe Shortcut App is a new AIR application that's a database of all of the keyboard shortcuts for all of CS4, all in one handy place.
Todd Kopriva reminds some of us that "To see all of the shortcuts, be sure to click All Categories. The default Essentials view just shows a small subset"! Todd thinks that "the information appears to be identical to that in the Keyboard shortcuts section of After Effects Help." For information on editing keyboard shortcuts and scripts (and scriptable AE commands without shortcuts), see the KeyEd Up script by Jeff Almasol.
Automatically generate the right view for a scene (using a very flexible camera rig). This relieves you from doing your compositing work twice.
Create anaglyph, side-by-side or interleaved previews of your 3D scenes, do global mastering like convergence adjustments and color grading and render the final left and right view separately
Perform elaborate preparation (that is, alignment) and editing of stereo footage
There's more info that comes with the scripts and video tutorials posted on Vimeo 1/2: and Youtube; here's a sample:
Motionworks' sorta weekly tour of built-in AE filters continues with guest presenter Maltaannon who explains some techniques for using the Angle Control effect with basic expressions. See Effects A-Z: Angle Control.
"It was the cooking of food that allowed our bodies to absorb more nutrients and our brains to get big. It allowed culture to form and even social arrangements such as dinnertime where we all ate what one of us spent time cooking; it probably even resulted in marriage (a kind of primitive protection racket, in Wrangham’s words). We’re really the only animal that does it, that cooks. That alone says a lot."
You can read about chef Bayless' own experience of this dish and episode at his blog Root4Rick. Michael Chiarello's blog is not so active, but he's done well with the food:
Steve Holmes is back with another Artbeats AE podcast, "Eight" Movie Title Effects, in which he joins After Effects with Artbeats stock footage to create a detailed textured movie title sequence.
A halftone is an image or printing technique that "simulates continuous tone through the use of dots varying either in size, in shape or in spacing." In the Illustrator and Photoshop
worlds, there's long lists of halftone filters, swatches, and
compositing techniques used for printing and newsprint, comic, retro,
and other effects. But the fun of After Effects is animation, and some
techniques may not be immediately apparent without built-in filters.
CrumplePop and Toolfarm and are making CrumplePop ShrinkRay, a Mac-only "tilt-shift miniaturization" effect for Final Cut, free through August 19, 2009. CrumplePop effects seem to be based on Master Templates (FCP 6+); you drag and drop a template onto your timeline, fiddle with a few controls, and the template does the rest.
Sometimes the explanations are too brief but there's often video demos and tutorials for these After Effects scripts (for example for Immigration); here's the video demo of AutoOrient Camera:
Satya Meka has a free New AE Plugin: "BAD TV" Distortion. It's a Mac-only Core Image filter ported using Effect Builder AE. Windows users can request a Pixel Bender port (already in development) or try out RGB Sine Distortion by Synja Dev Blog. Here's sample render of bad TV from Satya:
Update: ProJuice has a tutorial, Bad TV, on how to manipulate the settings in the default Bad TV Effect in Final Cut Pro and create an original rolling analogue TV effect.
Maltaannon has a new free Pixel Bender filter, Bitweiser Light, to help deal with problems with overerexposed footage. There more at Maltaannon, who's welcoming comments; the video demo is at Maltaannon, banished here for autoplaying.
"Sometimes, when making 3D shapes in after effects, you just can’t get two layers to line up properly. Here is a trick I learned [Alpha Add] to make sure your edges always look like they are perfect."
Topher Welsh's generic roundups fill some gaps; here's his latest collection of AE and 3D tutorials added late Monday: Huge Monday Roundup of ALL Sorts.
The SF Cutters are meeting August 18in San Bruno at the SFO Airport Business Center. The agenda includes a look at Final Cut Studio 3, Matrox solutions for video, and Ted Langdell with a 'How-to' on the use a waveform monitor and vector scope with FCP and Color.
Noted around the Interpipes is a series of think pieces to possible humans on the AE team, semi-anonymously from The FutureStack. While this might be a 'fix' for voyeurs like me lacking After Effects action on the Dear Adobe complaint site, apparently Crash Reports are read by humans, who may even want to reach you if you have continual problems. Here's a sample of the FutureStack reports, which are amusing ephemera if you're not sorting through thousands of others.
Adobe integrated some new technology into After Effects CS4, the Adobe Crash Reporter, which helped ID bugs for recent AE software updates. Paul Uusitalo, an After Effects quality engineer, described the details in a guest post on Todd Kopriva's Region of interest blog.
Later, Michael Coleman explained customer privacy and the Adobe Crash Reporter:
"Adobe is not monitoring your activity. After Effects detects the crash and we don't know anything about it until you send the report to Adobe. The report originates on your computer. If you choose to submit a report (and we very much appreciate if you would) only non-personally-identifiable information is sent to Adobe. This includes information such as which part of the software encountered an issue."
Information Is Beautiful graphed out a timeline of global media scare stories in Mountains Out of Molehills, and fleshed out other comparisons of issue attention in Patterns in the Group Mind -- here 'violent video games' are pondered regularly near Christmas and the Columbine anniversary.
[update: Apparently Y2K, SARS, Violent video games, bird flu, vaccines and swine flu have dwarfed other search terms -- but the comparison doesn't use "September 11" or other popular terms, so it's a McChart.]
Even if you know that the built-in CC Particle World filter allows you to use images as a custom or "Textured" particles, you may want to look at Video Copilot's latest free After Effects project.
To see a fuller scope of what Particle World can do, download the CycoreFX Particle World Demo. It's a poor man's version of Brian Maffitt's old demo in that you have to render each Comp separately and read along with the PDF.
VizWorld notes a new Online 3D Model Search Engine – 3dfilter. If you sort according to price you can see what's available for free in various categories.
"In this tutorial Mathias shows that corner pin tracking can do much more than just replacing some pictures on a wall. We are going to compose a wound on a moving head and use the Mocha tracker in combination with his script MochaImport. Trust me, this is so much easier then creating a real head wound!"
Maltaannon released his Youveelizer plug-in for UV mapping in After Effects. It sells for about $30. In addition, there's a tutorial to learn how to improve your your 3D workflow in AE:
'From this day forward you are able to take your 3D render and replace textures or even add reflections and environment. In a nutshell all you need to do is to apply the Youveelizer to a layer with a UV render pass to apply a texture to a rendered 3d object, or to a Normal render pass to add reflections. All 3d objects should be rendered out from a 3d application such as 3d Studio Max, Maxon Cinema 4D, or any other 3d package capable of rendering UV and Normal render passes.However it’s sometimes difficult to render out a nice UV pass. A solution to that problem may be simply applying a texture that simulates a good UV map. That’s why I’ve included a nice 2000×2000 pixels “uvmap_texture.tif” in the product package.'See also the article by Lutz Albrecht on Adobe Developer Connection, Integrating 3D applications with After Effects – Part 1: Working with UV data. More background and links are in the AE Help doc Importing and using 3D files from other application. Other options for re-lighting were discussed in the AEP post Normality 3 video tutorial.
Update: Among comments on ambient occlusion, mackdadd noted... "RE:Vision's Re:Map also does this sort of thing [UV mapping & more], although I haven't watched Maltannon's tutorial yet to see if they work the same way. Always good to have more (and cheaper!) options!"
Motionworks posted another in a series of informal chats with various plug-in developers, designers, and others. Unplugged 3: Zaxwerks is an interview with veteran developers Zax Dow on the origins of Zaxwerks and the 3D Invigorator, ProAnimator, and new 3D Serpentine plug-ins. As an Electric Image evangelist, Zax was a frequent visitor to Macworld and user group meetings at Entasis (old parent of Toolfarm) in San Francisco.
VideoHive has a new video tutorial by Topher Welsh , AE Quicktips #5 Changing Source Text. Topher discusses using a single layer to animate a variety of Text Layer messages by changing the Source Text parameter, and hiding the Hold keyframe changes in motion blur.
Meanwhile over at Red Giant in Look Ma! No 3rd-party plug-ins!, Aharon Rabinowitz skips the Hold keyframes to share workarounds for using numeric Text (for game scores and other digital readouts). You can do what he's doing with just the Numbers filter, but a door is opened to other purposes as the tutorial uses a Null, a Slider Control, and 2 expressions by Dan Ebberts:
1. (Not sure why it was needed) Round to the nearest whole number: s = thisComp.layer(”Null 1″).effect(”Slider Control”)(”Slider”); Math.round(s)
2. Layer marker triggers addition to current value: s = effect(”Slider Control”)(”Slider”); n = 0; if (marker.numKeys > 0){ n = marker.nearestKey(time).index; if (marker.key(n).time > time){ n–; } } s + n
 Adobe guys are tracking After Effects and Snow Leopard, the 10.6 version of Mac OS X. Besides upgrading to AE 9.02 for multiprocessing, there's not much up. For Photoshop & other products, John Nack is a good source of information.
 Update: CDM has an initial but in-depth review of something new in Snow Leopard -- Mac OS X 10.6: Quartz Composer 4.0 Hands-On Review, New Features.