CS Next is CS 5.5 at PVC has details and links to videos and more. New features include Warp Stabilizer, Camera Lens Blur, stereoscopic 3D camera rig, light fall-off, source timecode, & more!
Continuing updates on CS 5.5 will be available at AE Portal on PVC.
Here's a sneak peek at Warp Stabilizer a preview of new way to stabilize shaky footage in After Effects. After Effects Facebook says "It's a peek at CS5 getting better. For more information, come see us at NAB or stay tuned to this channel. More to come soon."
Adobe TV has a channel for other recent technology sneak peeks.
Update: "CS5 evolves" -- a little picture on front page of AdobeTV,
Mamoworld, home of Mathias Möhl and friends, has published a new quick tip tutorial (embedded below), Modifying Keyframes with KeyTweak. Mathias says that KeyTweak is a must-have when working with hundreds of keyframes, like in his stabilize motion tutorial. The new version is easier to use -- you can push around keyframes in the work area just using the Arrow buttons.
Mathias explains:
Although the new version of KeyTweak was published last December, I didn't have a tutorial about its new features (the new "local mode"), hence almost nobody discovered its potential so far. While the old version of KeyTweak (consisting only of the "global mode" of the new KeytTweak) had a somewhat confusing workflow (you needed to duplicate a property, delete all keyframes in it that you want KeyTweak to take care of etc), the new local mode is much more intuitive. With a set of arrow buttons you just move around all keyframes in the work area, and also fade in/out those changes if you like. The old "global mode" remains still useful for properties that are not 2D, like transparency (local mode works only with 2d properties and mask shapes).
Mathias Möhl has a new After Effects tutorial video (and project) on his Mamoworld website, Stabilize Motion Without the Need to Zoom, which reconstructs missing parts of the image from other frames (with the freedom to tweak and adjust not found in one-click solutions):
"In this tutorial you learn how to stabilize a shaky shot with the Mocha tracker and the MochaImport script. After stabilization, you usually need to zoom in a bit to get rid of empty areas that show up at the borders of the image. Instead of this, we use a clever technique to fill the missing parts at the borders such that there is no need for zooming any more. The technique uses frames before and after the current frame to fill in parts of the image that are missing in the current frame. Sounds complicated but works very well and is done with a few clicks using MochaImport.
Things to learn in this After Effects tutorial:
Learn how to track in Mocha (I use Mocha Pro, but it also works with any other variant)
Learn how to stabilize a shot with the MochaImport script.
Learn how to smooth the camera movement with a simple expression.
Learn how to fill in missing parts at the borders of the stabilized footage by inserting appropriate material from the frames before and after the current point in time."
A comment on the tutorial mentions an alternate method using the Echo effect to reconstruct missing areas; another option for minor adjustments is the YY_MorphShake plug-in by Andrew Yang, which stretches the edges of the layer to fill in empty spaces. See also Content-Aware Fill for clean plates + extending edges at AE Portal.
Chris Zwar shared some resources on first stabilizing shots with camera movement, then doing keys or roto in a thread on the AE-List on the Roto Brush tool ("roto assist" when it bogs down) .
"Roto Brush will disappoint anyone who HASN'T had to do meticulous frame-by-frame rotoscope work before, and therefore doesn't know how tedious and difficult roto can be. Having a tool that gets you 70% of the way there is still a valuable time saver. But I haven't yet had a shot where it worked perfectly by itself. [snip]
In the same way that keying can be improved by pre-prossessing the footage to remove grain and adjust hue/saturation, images can also be pre-processed to improve rotoscoping too, and to help the roto brush plugin.
When I'm doing roto on any scene with camera movement I use a 3-step inverse camera process- firstly I motion stabilise the shot, then I work on the stabilised shot, then I put the original camera movement back in. I call it 'inverse camera' but it's also called 'reverse stabilisation' and it's demonstrated in a much more interesting way by Andrew Kramer:
If I'm working with people who are new to rotoscoping then I get them to watch Andrew's tutorial first, because working on stabilised footage can make the roto process so much easier."
Update: Premiumbeat has something similar, taking "a look at the process of stabilizing footage using Adobe After Effects built in Stabilization feature. We will also look at how to apply a graphical element to the stabilized footage and then how to reverse the stabilization, to give a motion tracked effect to the graphics."
Digieffects launched a new inexpensive plug-in for After Effects, Atmosphere, which:
"... simulates atmospheric conditions such as haze and fog in your composition. Layers further away from the camera appear to be more deeply immersed in the haze/fog than layers closer to the camera. This also applies to parts of layers: If one edge or area of a layer is closer to the camera, this area will appear less immersed in the haze/fog than the pixels further away."
Here's a tutorial from Digieffects:
Atmospheric effects without a filter assist can be complicated; here are some resources:
You can watch the tutorials on iTunes or at RGTV, but here's a brief on the script:
Mocha Import explained in 3 Minutes from Mathias Möhl on Vimeo. Update: Mathias briefly clarified the strengths of approaches to tracking in AE in comments on his blog:
I personally use Mocha + MochaImport now for almost all tracking tasks, since tracking is more easy, robust and acurate with Mocha than with the buildin AE tracker. However, if you want to avoid the overhead in the workflow (switching to a separate application for tracking, importing the footage there and so on) and track in directly in AE, both TrackerViz and Tracker2Mask are your best friends.
use *MochaImport*
for all kinds of tracking tasks you want to do with Mocha, including corner pinning, stabilization tasks, rotoscoping tasks (as I will show in the second part of the creative Cow tut) and for compositing of moving stuff (with the stabilize precomp and RG undistort precomp functions). For rotoscoping, the mocha Shape plugin is a good alternative.
use *Tracker2Mask*
for just one specific task: tracker-assisted rotoscoping. Before you start keyframing masks for hours, track a few points and let Tracker2Mask assist you in the keyframing process. Use it in combination with KeyTweak.
use Nab's *TrackerViz*
if you need the buildin AE tracker for anything else than rotoscoping. In particular handy is the function to average tracks which makes out of a bunch of good but not perfect tracks one rock-solid track.
use *KeyTweak*
to correct drifting tracks (if the drifting was not eliminated by averaging with TrackerViz) and to continue tracks of points that leave the screen (see my Postcard Tutorial for details).
Update 2: in his post, Mocha and Perspective Distortion, Mathias clarified some confusion:
"Both my Mocha Import explained in 3 Minutes video and my tutorial on Red Giant TV have caused some confusion concerning the question whether Mocha can track perspective distortion and in what cases Red Giant Warp is needed in addition. So here are the facts:
(1) Mocha AE can track perspective distortion, even without Red Giant Warp. This happens if you enable the shear and perspective options.
(2) If you tracked perspective distortion with Mocha, it only ends up in After Effects if you use the corner pin data from MochaAE and not the transform data.
Now, if you want to use the MochaImport script to create a stabilized precomp, you have two options: Either you do it with transform data, or you do it with Red Giant Warp and corner pin data. Hence, point (2) implies that
(3) If you want to create a stabilized precomp with MochaImport, you only get the perspective distortion with Red Giant Warp .
(4) If you just want to do a corner pin or want to use the Mocha Shape plugin, you get perspective distortion and don't need Red Giant Warp.
Take home message:
If you track with shear/perspective enabled, don't use the transform data to get the track into After Effects.
One question is left, I guess:
What if you have to use transform data for your task and have a clip with perspective distortion (e.g. if you want a stabilized precomp but don't have RG warp)?
Then do the track whithout shear and perspective enabled. The resulting track will not be as good as with shear and perspective enabled, but at least no shear/perspective information is thrown away during the export to transform data. Hence you will get in total a better result (but don't expect miracles - with shear/perspective enabled and corner pin data or the shape plugin the results will be much better)."
To see more, you can check out SIGGRAPH 2009 papers on the web by Ke-Sen Huang. Below are a few related examples of research presented for SIGGRAPH conferences; some of these were mentioned earlier here at AEP, filed under "graphics" or "peek" along with interesting experiments by Microsoft and others. Of course seeing prototype demos doesn't mean you'll see shipping features anywhere.
The SIGGRAPH 2009 paper Multi-operator Media Retargeting furthers research in "content aware scaling" with multiple operators for scaling, cropping, and warping.
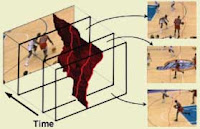
An inverse of "image patching" might be object tracking, extraction and manipulation, and new approaches are being considered here also. Interactive video cutout is an older interactive system for efficiently extracting foreground objects from a video.
The Video SnapCut demo for SIGGRAPH 2009 shows research more recent results in interactive object cutout/roto for video.
Mathias Möhl is the mind behind the Tracker2Mask & KeyTweak scripts (AEP backgrounder post). He doesn't post frequently to his blog AExtensions but his posts do present deep new features and include video tutorials. The latest script is MochaImport, which helps you apply the Mocha tracking data in After Effects in several ways. Here's tasks that can be done as one click operations, and the video tutorial:
create corner pin
create CC power pin
create AE trackpoints from Mocha track
stabilize footage
move layers according to track
create a precomp in which the footage is stabilized while maintaining the movement in the original composition.
There's also a not too recent script, Final Cut 2 After Effects Script from Popcorn Island, which is another partial workaround to avoid the cost of Automatic Duck. The script -- designed for CS3 -- presents "a simple way to move sequences in Final Cut into Compositions in After Effects. Not only does it allow you to work faster, it also saves storage space. The normal work flow of rendering out from Final Cut and opening in After Effects causes one to create temporary files to pass back and forth between the programs. The Final Cut 2 After Effects script will allow you to bypass that and simply use the footage that has already been imported into Final Cut." The current version supports:
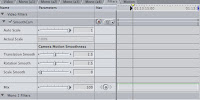
On one e-mail list recently someone was looking to stabilize shaky footage just in Final Cut, and now Flippant News has a demo in Final Cut Pro 6, which has a "filter that analyzes the clip and makes the image smoother. You can find this filter under EFFECTS> Video Filters> Video> SmoothCam."
Flowseeker posted about segment from the FxGuide podcast describing in a nutshell how to stabilize a moving camera in After Effects, a technique that is more thoroughly documented in his book, After Effects CS3 Studio Techniques. For more see, Camera Stabilization in AE.
 CS Next is CS 5.5 at PVC has details and links to videos and more. New features include Warp Stabilizer, Camera Lens Blur, stereoscopic 3D camera rig, light fall-off, source timecode, & more!