CS Next is CS 5.5 at PVC has details and links to videos and more. New features include Warp Stabilizer, Camera Lens Blur, stereoscopic 3D camera rig, light fall-off, source timecode, & more!
Continuing updates on CS 5.5 will be available at AE Portal on PVC.
Host John Dickinson leverages A Tale of Three Blurs, a Prolost article from 2006, to illustrate the key differences between Box Blur, Fast Blur, and Gaussian Blur.
Here's a few more resources to explore blurs further:
Less exact than Motionworks' quicktip but branching to other territory is Blur 100: Introduction to Blurs, a video by Vfx Hauiku. He doesn't talk about Frischluft Lenscare, an AE filter used by many power users, but he does discuss related filters in Eyeon Fusion (see the AEtuts intro).
It's a commercial almost completely done in CG. 3D renders were done in multiple passes. Roman and his partner used Frischluft's Lenscare plug-in to control of depth of field, and extra glows and flares, crushed blacks, and vignettes were done in 32-bit full-float with the standard AE color correction tools plus Magic Bullet Looks.
If you missed them, Digieffect released tutorials for its Depth plug-in awhile back. According to Mark Christiansen, Depth, a filter found in the old Buena Depth Cue package, "does just what the name implies, easily extracting 3D depth data for use with Digieffects plug-ins such as Camera Mapper, Atmosphere and Falloff Lighting ... I especially like it for lens effects that can use depth information to create beautiful cinematic bokeh blurs."
For other approaches, tutorials, and tools check out previous posts tagged focus and AE camera. For example, Mathew Fuller covers techniques for extracting depth from 2D still images in his video tutorial Advanced 2.5D Animation in AE.
Michael Eggert of PixelphileTV posted a tutorial and free preset in After Effects Rack Focus (via Lester Banks):
"We take a look at how to add a digital rack focus to any existing footage. This will add production value to shots that were made on video cameras that don't have a shallow depth of field. You will also learn how to make your own custom presets.
iRack 1.0 is a Rack Focus preset for After Effects CS3/CS4/CS5. With this preset you can add the look of a professional focus pull to any existing footage."
For similar tutorials and tools check out previous posts tagged focus, blur, and AE camera.
Note: Very different approaches include the use of Lens Blur (a Video Copilot tutorial is just one of many) and related filters like the Sapphire RackDefocus effect, which defocuses using an iris shape convolution to simulate a real camera defocus,
Via @aescripts are reports of experiments in Plenoptic lens rendering by Adobe, which lets you change depth of field focus in post. It would be great in After Effects and video too, of course (go wish), though now there's only 1 shipping camera system, the Raytrix 4D lightfield camera.
Video Copilot has added native motion blur, along with bug fixes, in a free update to Optical Flares:
"The feature is simple to use, just turn on motion blur for the layer and comp switch, then adjust the samples in the plug-in Motion Blur roll-out. The light streaks in the sample video are made with Particular and the light is moving with a wiggle expression. Remember, too many motion blur samples can be slower so adjust the value as needed for your project."
"In a recent tutorial Animating a Still, we used tracking data from a real hand-held camera to give our still image a natural look, as opposed to using a mathematical expression like the wiggle. This gave our footage a natural organic look that would be difficult to achieve with expressions.
Then I thought I would try a similar experiment utilizing a real optical rack focus. So I filmed a dark square while performing a real rack focus to see if I could extract the information inside of after effects to use with a 3D camera."
The Video Copilot community offered several alternatives in Comments to Andrew's post. Also, Maltaannon tweeted that it would be simpler with his CE PixelSampler -- if you have the time to install and explore it. Maltaannon leverages the sampleImage expression; it doesn't give you the read out on the screen, but it does return the color value, so you can link it to a text layer.
[update: on the AE-List David Torno explains why there may be problems with "Custom Effects" in CS5, "Maltaannon builds his Custom Effects usually involves a psuedo plugin via the "preseteffects.xml" file, like how I did my Handheld Camera script. I found out when trying to update my script that Adobe changed how those plugins are referenced in CS5. So the code syntax needs to be updated. I gave him a heads up when I found this, not sure if he's seen that yet or not though. It is fixable manually if you feel like diving into the code, but it's not for the faint of heart. "] For more on sampleImage, see posts by Dan Ebberts, by Todd Kopriva,sampleImage() is fun and More fun with sampleImage(): Ascii animation in After Effects from Creative Workflow Hacks, and info in Creating Motion Graphics (4th edition, Bonus Chapter 35B, page 48 under Sampling Colors; in CMG 5, it's in chapter 37B, page 49).
Motionworks has a video tutorial by Grischa Theissen on using the ReelSmart Motion Blur filter in After Effects on footage created in Cinema 4D. There's a lot more on this filter at RE:Vision Effects.
Stu Maschitz reminded everyone in a Twitter note about his 2006 post A Tale of Three Blurs, which champions Box Blur in After Effects. Box Blur is adaptable with a "Repeat Edge Pixels" option and iteration controller. It approximates a Gaussian blur with 3 iterations, though Blur Radius might be lower (like 2) than Gaussian Bluriness (like 5). Iterations only works in whole numbers; you might need to gear down with the Ctl/Com key to get fine control over Blur Radius.
Lynda.com is hosting After Effects: Insight into Effects, created and produced by Trish and Chris Meyer. Insight into Effects covers the AE blur effects, and includes hidden gems, optimal parameter ranges, "gotchas" to avoid, and alternatives to consider.
Update: Chris and Trish Meyer also posted After Effects Tips 5: Going for a Scroll explaining techniques to easily create scrolling banners, ticker tapes, and other graphics. And later they covered important basics in After Effects Apprentice Video Tutorial #6 , "a quickie on how to use the 3D Axis Arrows to manipulate 3D layers"
In the latest edition of Digital Arts, Sam Hampton-Smith shows how to recreate the trendy tilt-shift lens effect in After Effects. Eventually this link will work, but for now you'll have to look at a hard copy: Fake the tilt-and-shift look using After Effects.
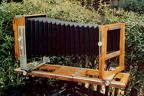
I'm sure a free AE tutorial will show up soon, but for now the outline re-described in the earlier post (and comments) Tilt-shift photography meme should do fine, if you have a soft touch on your gradient for the Lens Blur, Compound Blur or such filters. 2D Depth of Field, a 2006 video from VideoCoPilot, comes close but is missing something since it had other goals. According to a thread on the AE-List, further understanding can be gained by learning about view cameras, and by extension the Scheimpflug principle for changing the “plane of sharp focus.”
Update: Topher Welsh has a tutorial for AE, though it's not the first one:
On the AE-List, Ross Shain of Imagineer Systems posted a note on a motion blur script for mocha corner pin data by Yan Masterson of Spot Post. The preset uses expressions to link a Directional Blur filter's angle to a corner pin.
"From Yan..... 'Mocha is such a great tracker, it was worth working out how to add motion blur in AE from the corner-pin data. So here's a link to an After Effects favourite that does just that with a directional blur. The expressions only deal with planar motion-blur, which is good enough for most shots (i.e.those that don't crash-zoom).'
A few notes on how to use it: Copy and paste your corner-pin tracking data from Mocha, and paste it onto your layer in AE as usual. This adds a corner-pin effect to your layer. Then apply this MB_for_Mocha favourite to the same layer. This adds a directional blur effect linked to the corner-pinning. All you need to do now is match the amount of blurring. Move on to a frame in the timeline where you have lots of movement. In the directional blur effect in the timeline, drag the 'Blur length' up until the amount of FG blur matches your BG shot (about 150 works for me). The 'Blur length' will pop back down to 0.3 or so - that's because it's calculating the blur based on the amount that you just gave it divided by the amount of movement for that particular frame. Presto! Motion blur!'"
Ross adds, "Also note that a Red Giant's Warp and RE:Vision's Re:Map Planar can both use mocha track data for corner pinning with motion blur." And there's even a newer tutorial for using Red Giant Warp & mocha for After Effects by Eran Stern.
John Nack has been posting items about Tilt-shift photography for a couple of years, and the meme has been hitting strong lately with application of the technique in video. Tilt-shift photography's miniturized scale model look and stop-motion feel is right at the point of cliché -- there's even a new iPhone app that creates tilt-shift photos which was reported today at Wired.
The New York Times has had a few items too, including a talking slideshow by Vincent Laforet (see picture at left), who has already moved on famously to DSLR video using the Canon 5D MKII. Others posting a stream of items on the trend include Wired and Boing Boing.
There's also a number of articles on Faking tilt-shift with Photoshop (the real thing even with a Lensbaby is not cheap). The basic approach is simple and can be done easily in After Effect or Premiere:
Update 01/06/09: Brian Maffitt adds a comment on the AE-List, "Trouble with a mask approach is that, while the blur looks good at the edge and the sharp area stays sharp, the intermediate blur is a cross-dissolved composite of blurred and non-blurred which looks "unnatural", especially at large blur amounts. I prefer using the "Depth Map Layer" in Lens Blur, which uses a separate gradient layer to modulate the blur effect based on pixel value. You'll have to fiddle a bit with focal distance and iris radius, but you can get a convincing Tilt-shift with this approach.
Compound Blur can do the same thing and renders more quickly, but without the ability to repeat edge pixels, and the blur is a slightly-less natural gaussian style, rather than the more accurate lens blur. If you use a ramp to create your gradient, make sure to precompose the effect or the blur filters won't see it."
In the same thread, Trish Meyer added a tip for changing the frame rate: "you'll render faster by putting the original movie in a precomp, lowering the frame rate, and turning on the Preserve Frame Frame option in Comp Settings Advanced."
Update 2: see Michael Vitti on selective focus in Comments.
'M dot Strange', who has a YouTube following that interested the New York Times (his FCPUG preso is on MacVideo.tv), briefly compares After Effects filters Frishluft Lenscare and TinderBox T-Lensblur Defocus with images of the original image in focus, defocused in camera, and the original after filter processed in Bokeh in After Effects.
"Discussing about 4:2:0 colour sampling recently, I realized that there is still the misconception that Magic Bullet's deartifacting tool is a fancy name for chroma blur. Well, it definitely isn't. It might be difficult to see the difference just by looking at a frame but there is a way to demonstrate very clearly what each tool does." ...see the full article at Eye Candy.
 CS Next is CS 5.5 at PVC has details and links to videos and more. New features include Warp Stabilizer, Camera Lens Blur, stereoscopic 3D camera rig, light fall-off, source timecode, & more!