Filmmaker IQ included 7 tutorials from AEtuts Hollywood Movie Title Series. Below is a recent one not included. “After Effects Tutorial: Thor Trailer Titles” is from Chris Tarroza, who used the Shatter effect for his 3D text.
For additional resources on titles, see AE Portal posts tagged title.
Creating 3D text in After Effects has long been a cottage industry, generating many workarounds and 3rd party plug-ins.
Adding to the parade is one of the big new features in After Effects CS6, the extrusion and material options in the Ray-tracing renderer, which almost requires an Nvidia GPU. Many will benefit from beautiful renders with the new features, though many will get bogged down by requirements, render times, or inadequate features, and turn to older methods surveyed here.
Update: Despite some optimism, in the summer of 2014 Adobe appeared to be leaning heavily on a single 3rd-party app for future 3D. For more and major current tool options, see the above roundup and AEP's Comparing 3D type options for After Effects, where you'll find that Ray-traced 3D was declared (walking) dead by Adobe. Ray-traced 3D still works, but it will be retired in some future release.
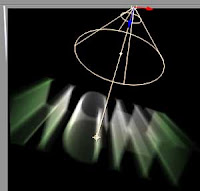
Andrew Kramer released his "Tron-Pilot" After Effects CS4 project file and a short video walk-through which describes creating the faux 3D text in AE (adding the Vegas filter for a volumetric effect) and building a few expressions. The project was previewed in December.
There's some other tutorials to mimic the TRON look, and some background on the VFX of TRON: Legacy from Fxguide (on face replacement effects), [update: Talking Tron with Digital Domain at Motionographer,] and in numerous "Making of" videos like those posted by Digital Domain. Here's a few more tutorials for After Effects, veering off with a few on neon:
In a TRON trailer the title text flickered. Motion Graphics Exchange has an expression from AEnhancers that creates a flickering effect similar to a flickering neon light.
The first 'Forget the Film, Watch the Titles' DVD set is coming soon. Its 2 DVDs feature almost 3 hours of content: 38 of the best contemporary title sequences from 2003 to 2011 and 9 short documentaries about title designers shot on location in L.A., Paris, London, Amsterdam, and Berlin.
'Because I was working with static 2D artwork, I used various lightning effects to add depth to each scene. I created various mattes within After Effects to create a "Kodalith"-style glow to my light sources, which backlit most of my foreground elements. I also sandwiched layers of semi-transparent "mist" (usually just a white gradient) in-between every layer to help with the illusion of depth.After Effect project screenshot.
In addition to animating my 3D camera, I also created isolated effects to punctuate each shot. Blood spatter opens the sequence (these individual droplets started life as brushes in Photoshop, but were scaled up and retouched by hand for HD resolution), leaves drift across the screen, and there's a fly cameo. This buzzing insect was my homage to the clouds of flies that often surround the zombies in the comic, a horrible detail that always gives me the shivers.'
It's an unlikely topic for a cable channel known for Mad Men and Breaking Bad, but we're primed after recent views of the Dead Set and The Crazies (bad acid aka BZ).
The title sequence for “Thank You for Smoking” (2005) is a modern manifesto on typographic style in title design. The idea for using cigarette packaging for the opening sequence was suggested by the film’s director, Jason Reitman, and implemented by Shadowplay Studios. Typographica goes through the trouble of pointing out the fonts in the sequence:
Last March at NAB, The Foundry made a splash with news of new plug-ins for After Effects, Kronos and 3D CameraTracker, which are being released today.
Kronos is for "hard core retiming" -- leveraging GPU and built on a newer foundation than the previously-licensed Timewarp filter bundled in After Effects.
Camera Tracker is a new After Effects plug-in for matchmoving by The Foundry. It analyzes "source sequences to extract the original camera's lens and motion parameters, allowing you to composite 2D or 3D elements correctly with reference to the camera used to film the shot. You can now match camera moves within Adobe® After Effects®' 2.5D environment, opening up new, robust options for the placement of composite elements, such as the creation of Fringe / Heroes style 'in scene' titles, the virtual extension of sets", etc...
Imagineer System has a new tutorial, Tracking titles in perspective with mocha V2 that shows "how to use mocha's planar tracker to match titles to camera movement. This is a good video to check out if you are a new user and includes a section on finishing in After Effects."
"After Effects guru Brian Maffitt of Total Training took time off from the Creative Cow Conference to share with us some tricks on using 3D space in After Effects.
In his first example, he took some 3D layers that were elements of a biplane, enabling the Advanced rendering engine to take intersections into account. He then precomposed the biplane layers. The initial result was a flattened, 2D version of the plane. However, once he enabled the Collapse Transformations switch for the precomp, he now had a fully 3D plane again, with the advantage that it could be manipulated by animating the single precomp layer - a very nice trick
Brian then moved onto a demo that used a sliced human head that he downloaded from The Visible Human Project. He took the layers, distributed them horizontally by small intervals, and then turned them all into 3D layers. He then rotated them all in 3D space. Next he precomped them, resulting in a solid 3D head that he could spin around. To make the head semitransparent, he reduced the Opacity of the slices and blended them using Transfer Modes, resulting in a luminous, volumetric model of the head. Different transfer modes resulted in different features being highlighted.
Brian then showed other ways you could use this technique to create volumetric 3D models in After Effects. For example, he created a loop using the Fractal Noise plug-in, duplicated it 60 times, offset them in 3D space, and then offset them in time from each other. The result was a series of cloud formations that seemed to rise up from a floor."Note also Chad Perkins' brief look at Photoshop Extended volumetrics and DICOM images mentioned in Photoshop text as 3D volume in AE.
[update: Toolfarm is having a Video Copilot Sale -- 30% on ALL Video Copilot products Wednesday and Thursday, May 26 & 27, 2010 only.]
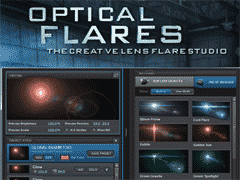
Video Copilot has released CS5 compatible versions of their After Effects filters -- free upgrades (OF, others, + update) from the previous versions. The standout among these is Optical Flares, a newer plug-in that leapfrogs longtime industry leader Knoll Lens Flare Pro in interface and features for about 1/3 the price. Here's a demo:
Andrew Kramer and company have taken a page from the Magic Bullet Looks approach to create a powerful and easy-to-use interface. The custom interface offers drawers full of visual presets and detailed control over individual flare elements, as well as a large adjustable preview of the composite or the flare alone. The advanced UI along with GPU acceleration allows users to build, edit, and manage unique and complex lens flares with speed and simplicity.
All of these features and more are built into this one plug-in:
3D lens flares with AE Lights
2D + 3D occlusion or obscuration
edge flare-ups
auto-tracking
auto-animation
textures
matte box
In the latest release for CS5, the preset drawer has been dropped in a favor of an exposed browser panel, but new abilities to rearrange, resize, and toggle window panels are nice. The best way to evaluate Optical Flares yourself is to review the profusion of video intros and tutorials at the Video Copilot website -- there is no eval or trial version. Owners of Optical Flares get access to even more training, so there's no need to purchase extra training. There's also the VideoCopilot Preset Network and filter forums for help and inspiration.
Knoll Lens Flare Pro (which is not available for CS5 until summer 2010) has offered most of the same features with the addition of public beta releases, but without the integrated visual interface. Perhaps KLF's sole remaining advantage is that in addition to the main filters, 19 lens elements are also included for minute control over parameters, though you should be able to get similar control in Optical Flares using presets. For now, Optical Flares is an After Effects-only filter, but it is said that versions for NLEs, Photoshop, Fusion, and Nuke are under consideration.
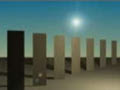
If you don't have a dedicated lens flare filter, and there are only two in this league, you're in for a treat. Overuse of lens flares is common though -- but with a filter like Optical Flares, you can rise above the common cliche of the Photoshop default (at left). Individual flare elements can be used as the base, as seen almost everywhere, or as elements of design.
Use in more realistic shots may take some extra observation and self-control. Tony Reale recently introduced ideas on using lens flares in edits in his After Effects tutorial Add Anamorphic Lens Flares to Video. There's a lot going on beyond the basics with lighting, camera filters and lenses, etc. and lens flares can become obsessions to avoid, create, or recreate. One good resource for study is a cache of QuickTime movies of real world lens flares by Claudio Miranda.
Another obvious resource is J.J. Abrams' "ridiculous" use of kinetic halos in the latest Star Trek movie (Andrew Kramer did the titles). See various discussions of these mostly in-camera effects done by cinematographer Dan Mindel in Where No DP Has Gone Before at ICG Magazine, and more about ILM custom matching "SunSpot" CG in Back on Trek (Flare Madness) at Millimeter & Star Trek Returns at Post Magazine.
Update: Kevin McAuliffe wrote a substantive review of Optical Flares for ProVideo Coalition.
Update: Johan Romera shared Nuke2AE Optical Flares Gizmo, a Nuke script that corverts 3d data to 2d position to create AE keyframe data for Optical Flares.
via @hashae... Carl Larsen posted Living By The Spirit Titles, an After Effects tutorial video that shows you how to create titles using depth of field rendering, Trapcode Particular, and some free live-action footage. A project file is also included.
For more, see the "Popular" posts of Smashing Magazine, which has made a cottage industry of these sorts of collections. One example is The Ultimate Collection Of Free Vector Packs.
'“Het Klokhuis” (The Apple Core) ... is Holland’s oldest youth television show, covering everything from the history of dinosaurs to how an iPhone is made. It is a hybrid of hand crafted frame-by-frame animation and cleanly rendered apples with sprouting science experiments encapsulated like the seed of an idea about to be discovered.'
Corey Barker has an interesting Photoshop Extended example of 3D text as a volumetric solid ala Superman titles at Planet Photoshop. In a square file, he duplicates a text layer and turns them into a 3D volume using 3D > New Volume from Layers. The chunk of light imports into After Effects fine but you have to make the layer 3D (not just the Controller) for it to accept Lights. You also might animate the Camera and the Z-scale of the Controller layer.
Chad Perkins showed various CS4 methods of Converting from 2D to 3D and did something similar with DICOM images.
PS 3D in AE can be a bit wonky, and options include mass Z-space manipulations or the use of Trapcode 3D Stroke (see lightcycle.mov), or the 2D Echo filter built into AE as sketched by Chad Castleberry in his After Effects tutorial on YouTube (or more drawn out in a Vimeo revision):
There's an interview with Danny Yount, "one of the top title sequence designers for film and television," on the Sherlock Holmes end credit sequence at The Art of the Title Sequence.
And in this video from FORA.tv (via FilmmakerIQ), Yount talks bout his 'creative process, taking us step by step through his inspiration, pitches, frames and storyboards to the final outcome. He won an Emmy for his concept, design and direction of HBO's Six Feet Under, which has been termed "television's most gorgeous opening sequence". He has also won many notable industry awards for his work, including a TDC, BDA Gold, D&AD Silver and 3 Gold AIGA awards. His recent sequences for feature film Iron Man were profiled in Creativity Magazine's top 5.'
Harry Frank returns quickly with a new After Effects tutorial, Drifting Title Sequence. In this follow-up to an old "Grunge Tutorial," Harry Frank shows you "how to use multiple nulls and parenting to simplify an otherwise complex camera move. Then use Particular and some additional effects to dress up the scene." This includes an expression to control a Lens Flare on animated layers.
Topher Welsh's generic roundups fill some gaps; here's his latest collection of AE and 3D tutorials added late Thursday: 72 Tutorials For Ya!
Of the ones not mentioned here previously, AETuts' Create Harry Potter Titles by Robert Holtby is not complicated, but you do get a Harry Potter font and see how to use a Bevel and Emboss Layer Style to make text seem like 3D, etc.